How to Create Actions in Photoshop
Photoshop actions are an extremely powerful timesaving tool that any graphic designer or photographer should learn to use to their advantage. Most people who use photoshop have heard of actions and they may have even used some pre-made photoshop actions, but I've found that far too many designers don't know how to create actions of their own. It can seem intimidating, but once you've gone through the steps a few times, creating actions in photoshop is actually pretty simple.In this post I'm going to go through the step-by-step process of creating one of my most-used photoshop actions. I use this action literally every time that I open a new image to edit. I know that 99% of the time, I'm going to want the image to be in RGB mode (it's simple to switch color modes the other 1% of the time) and I always want to keep the original background layer intact so I duplicate it. Let's get started.
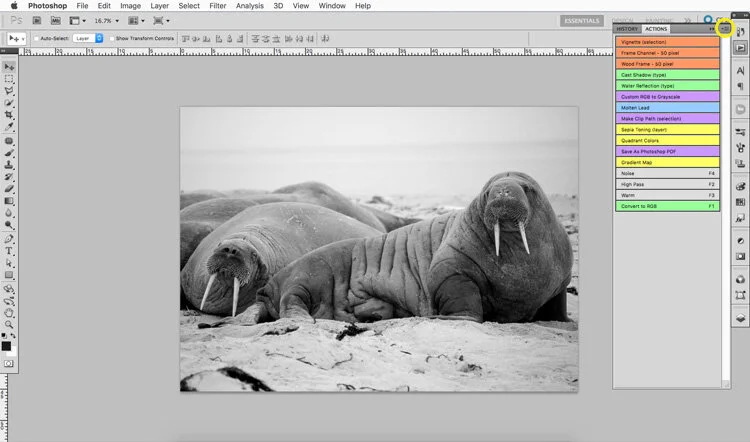
The first step is to open an image in photoshop. Any photo will work, but for this tutorial I've chosen this great shot of some walruses by Jay Ruzesky courtesy of unsplash.com.
Once you've opened a file, let's convert it to grayscale. Click on Image in the menu bar, hover over Mode in the dropdown menu then click on Grayscale. (If you are greeted by a popup, go ahead and click Discard)
Ok, on now let's create our first action. Go back up to your menu bar and click on Window and select Actions from the dropdown. This will bring up the actions window.
Click on the flyout menu in the top-right corner of the actions window.
If Button Mode is checked, click on it to deactivate button mode.
Return to the flyout menu and click on New Action.
In the popout menu, give a name to the action that we are about to create; I called mine "Convert to RGB". It's a good idea to give descriptive names to your actions so you can always find the action that you need. Since I know that this is an action I will be using all the time, I want to assign it to a function key: click on the dropdown and select F1. I like to organize my actions by color as well; I make my most commonly used actions green. All of these options can be edited later if you want to change the keyboard shortcut, action name or color. Finally, click on Record.
Now photoshop is watching and remembering everything you do. Each step will be compiled into a single action that can be repeated later with one easy click.
For this example, go back up to your menu bar and click on Image then hover over Mode again. This time click on RGB.
We could be done here, but to really take advantage of the power of actions we're going to combine two steps into one action. So, click on Layer in the menu bar then select Duplicate Layer from the dropdown.
I prefer to leave the default layer name for this step. Just click on OK.
Alright, we've done everything that we want this action to do so it's time to tell photoshop to stop recording. You can use the flyout menu in the actions window (remember to use Window>Actions if you don't see the actions window) then click on Stop Recording. Alternatively, you can click on the little square in the bottom left corner of the actions window to stop the recording.
You should now see your newly created action in your list of actions. Use the flyout menu to switch to Button Mode.
Now you can simply click on the Convert to RGB button in the actions window to convert the document color mode to RGB Color and make a copy of the original background layer. Almost a dozen clicks (plus menu navigation) compressed down to one click. Even better, get comfortable with the keyboard shortcut that we assigned to the action; for me that means holding down Function ("fn" on the keyboard) then pressing F1.
You can test this action by opening a new file and converting it to grayscale (like we did in the first step of this tutorial) then running the action. The color mode should change to RGB and you should have a new layer called "Background Copy".
While automating ten clicks may not sound significant, imagine saving those seconds 10-20 times a day. Every day. For the rest of your career. Now imagine you've created a whole set of actions that fits your workflow perfectly. With photoshop actions you can literally cut hours of your workweek down into a few minutes. THAT is productivity.
To give you some ideas of more ways to use actions, here are a couple of my most-used actions:
High Pass: The High Pass filter is my favorite way to add sharpness to a photo. This actions compresses [Layer>Duplicate Layer. Filter>Other>High Pass>Radius of 3>OK. Overlay Blending Mode. Opacity 50%.] into one super-quick keyboard shortcut.
Noise: I almost always end up adding at least a small amount of noise to a photo. I created an action that makes these steps: [Layer>New Layer>Mode: Overlay, Fill with 50% Gray>Name Layer "Noise">OK. Filter>Noise>Add Noise>Amount: 5%. Opacity 50%.] into a single click.
Hopefully by now you realize the amazing power of photoshop actions.
I highly recommend that you to take the time to assess your own workflow and find the repeated tasks that actions could take care of for you. Invest the minutes creating actions now to save yourself untold hours in the future.
Follow me on twitter to continue the conversation:


